# ELK 简单介绍部署和使用
这里主要说明先ELK都是什么,具体都干什么用的。
# ELK 基本概念介绍
E=(elasticsearch): 主要是存储收集的日志数据用的,有点类似mongo的意思。Elasticsearch是一个实时分布式搜索和分析引擎。它让你以前所未有的速度处理大数据成为可能。
L=(logstash): 数据传送到elasticsearch的工具,类似于linux命令里面的管道符。官网的介绍:Logstash 是开源的服务器端数据处理管道,能够同时 从多个来源采集数据、转换数据,然后将数据发送到您最喜欢的 “存储库”
K=(kabana):就是数据展示的UI界面。
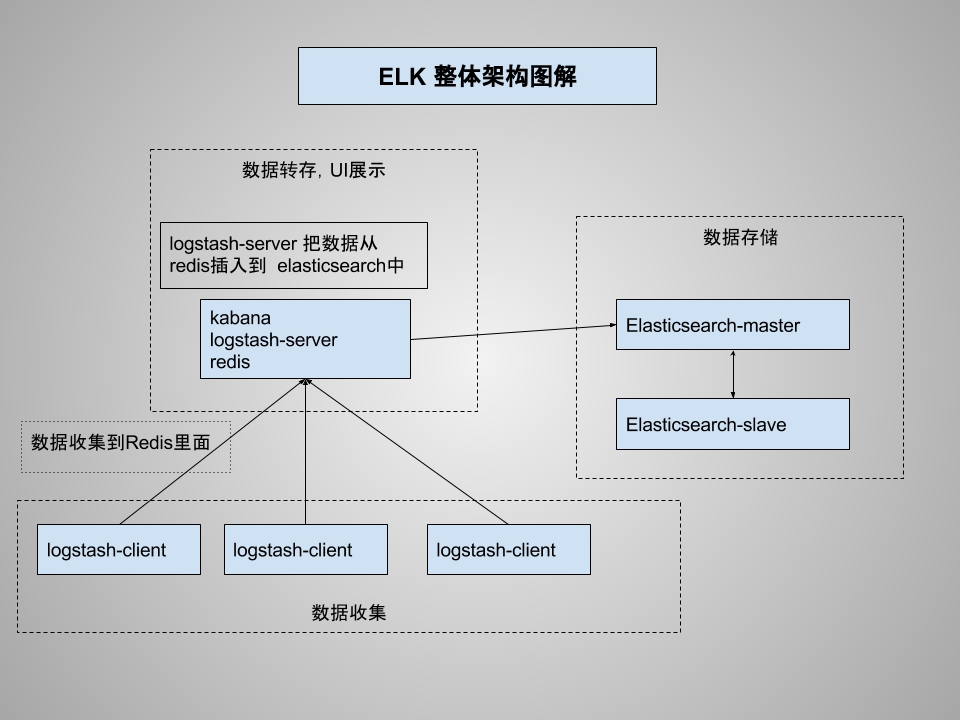
# 架构图
本次部署架构图解,主要多了一步骤,Redis使用。

# 部署
实验内容没有安装架构图来,服务器不够,都是单机模式,生产环境会改成分布式。
# 基本硬件需求
| 名称 | hosts | 硬盘配置信息 | 网络 | 备注 |
|---|---|---|---|---|
| 数据存储 | ELK-elasticsearch | 内存最低2GB/硬盘40GB | 内网联通 | |
| UI展示 | ELK-kabana | 内存最低2GB/硬盘40GB | 内网联通 | |
| 数据采集 | ELK-logstash | 内网联通 | 这个主要根据你nginx_log以及收集日志的位置决定 |
# 下载
elasticsearch 下载地址:https://www.elastic.co/downloads/elasticsearch
本次使用版本:
wget https://artifacts.elastic.co/downloads/elasticsearch/elasticsearch-5.6.3.tar.gz
下载到:ELK-elasticsearch /opt/目录下
tar -xf elasticsearch-5.6.3.tar.gz
cp -rf elasticsearch-5.6.3 /usr/local/elasticsearch
其他两台服务器同理 都下载官网最新版本软件 ELK-kabana ELK-logstash
安装一个redis 在ELK-kabana服务器。
每台服务器需要安装java,安装java版本在1.7及以上即可。
# 配置
# elasticsearch
主要修改config/elasticsearch.yml
path.data   ## 数据存储地方
path.log    ## 日志存放处
network.host:0.0.0.0  ## 对外访问IP
http.port: 9200   ## 对外访问端口号
启动:
nohup runuser -l elsearch -c '/bin/bash /usr/local/elasticsearch/bin/elasticsearch' >>/tmp/elsearch.log &
说下为啥使用 runuser 因为elasticsearch启动用户是不能使用root的
# kibana
修改 config/kibana.yml
  server.port: 5601   ## 对外访问端口  可以使用nginx 代理,htpassword做密码认证。
  server.host:        ## 对外访问IP
  elasticsearch.url:  ## elasticsearch URL地址
启动:
nohup ./bin/kibana >>/tmp/kibana.log &
# logstash
这里重点说下
# logstash抓取数据到redis
这里已抓取nginx log日志文件为例子:
nginx log日志格式
## logformat
log_format access '$http_host $remote_addr - $remote_user [$time_local] "$request" '
         '$status $body_bytes_sent "$http_referer" '
         '"$http_user_agent" '
         '$request_time $upstream_response_time '
         '"$http_x_forwarded_for"';
2
3
4
5
6
7
logstash.conf 配置文件
input {
           file {
                   path => "/data/access_nginx.log" ## nginx日志文件存储地址
                   type => "nginx_access"
           }
   }

filter {
   if [type] == "nginx_access" {
           grok {
                   ## grok数据格式整理,可以去官网学习logstash grok格式
                   match => [
                   "message", "%{IPORHOST:http_host} %{IPORHOST:user_ip} - - \[%{HTTPDATE:timestamp}\] \"(?:%{WORD:verb} %{NOTSPACE:request}(?: HTTP/%{NUMBER:httpversion:float})?|%{DATA:rawrequest})\" %{NUMBER:response:int} (?:%{NUMBER:bytes:int}|-) %{QS:referrer} %{QS:useragent} (?:%{NUMBER:request_time:float}|-) (?:%{NUMBER:upstream_time:float}|-)"
                   ]
           }
   }
           geoip {
                   source => "user_ip"
                   ## 用户IP地址
           }

   if [type] == "nginx_access" {
           date {
                   match => [ "timestamp" , "dd/MMM/YYYY:HH:mm:ss Z" ]
           }
   }
           useragent {
                   target => "ua"
                   source => "useragent"
           }
   }
   output {
       redis {
            host => "127.0.0.1"  ##添加插入数据的redis地址
            port => 6379
            data_type => "list"
            key => "logstash:nginx_log"
       }
   }
2
3
4
5
6
7
8
9
10
11
12
13
14
15
16
17
18
19
20
21
22
23
24
25
26
27
28
29
30
31
32
33
34
35
36
37
38
39
启动logstash 抓取日志
nohup ./bin/logstash -f logstash.conf >>/tmp/logstash.log
这里为了省事直接用的nohup 可以使用supervisord 对进程进行管理
# logstash 把redis数据导入elasticsearch中
logstash 配置文件信息 logstash_redis_output.conf
 input {
        redis {
                data_type => "list"
                key => "logstash:nginx_log"
                host => "127.0.0.1"
                port => 6379
                threads => 2
        }
    }
    output {
        elasticsearch {
                hosts => "ELK-elasticsearch"
                index => "nginx-access-%{+YYYY.MM.dd}"
        }
    }
2
3
4
5
6
7
8
9
10
11
12
13
14
15
16
17
启动logstash 把数据导入 elasticsearch
nohup ./bin/logstash -f logstash_redis_output.conf >>/tmp/logstash_redis_output.logstash
未完待续
